Live Chat
Overview
Live Chat allows you to
create
a chat channel that you can embed on your own website and service with your own live operators.
You can also add a bot to your channel to learn from your operators, and service requests when no operators are available.

Creating
You can create your own live chat channel from the
browse
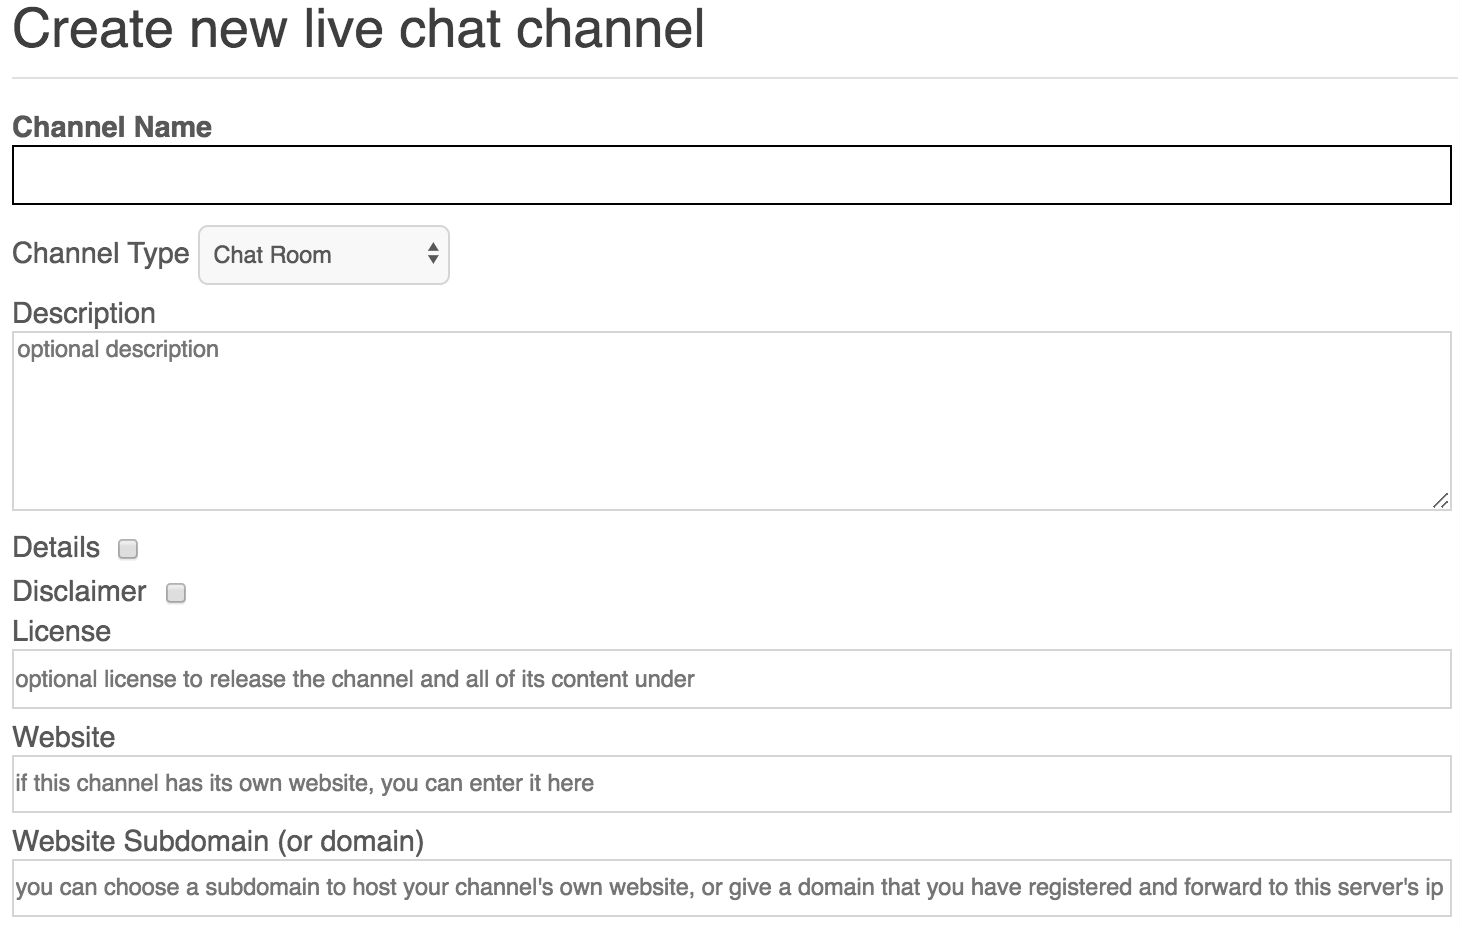
live chat page. To create a live chat channel, just give it a name, description, and category to categorize it under.
You can either make the live chat channel private and choose who can access it, or make it public and accessible by anyone.


Properties
| Properties |
Description |
| Channel Name |
Enter a channel name. |
| Channel Type |
The channel can either be a chat room that allows multiple users to chat with each other, or one on one channels where users are queued to chat with an administrator. |
| Description |
Optional description. |
| Details |
You can enter optional additional information. |
| Disclaimer |
You can enter optional legal information. |
| License |
Optional license to release the channel and all of its content under. |
| Website |
If this channel has its own website, you can enter it here. |
| Website Subdomain (or domain) |
You can choose a subdomain to host your channel's own website, or give a domain that you have registered and forward to this server. |
| Categories |
Comma separated list of categories to categorize the channel under. |
| Tags |
Optional comma separated list of tags to tag the channel under. |
| Private |
A private channel is not visible to the public, only to the user and users grant access. |
| Hidden |
A hidden channel is not displayed in the browse directory. |
| Access Mode |
Define who can access this channel. |
| Fork Access Mode |
Define who can fork(copy) this channel. |
| Content Rating |
Rate the channel. |
| Video Access |
Define who can broadcast video in this channel. |
| Audio Access |
Define who can broadcast audio in this channel. |
| Ad Code |
You can display ads on your channel's pages. |
Embedding
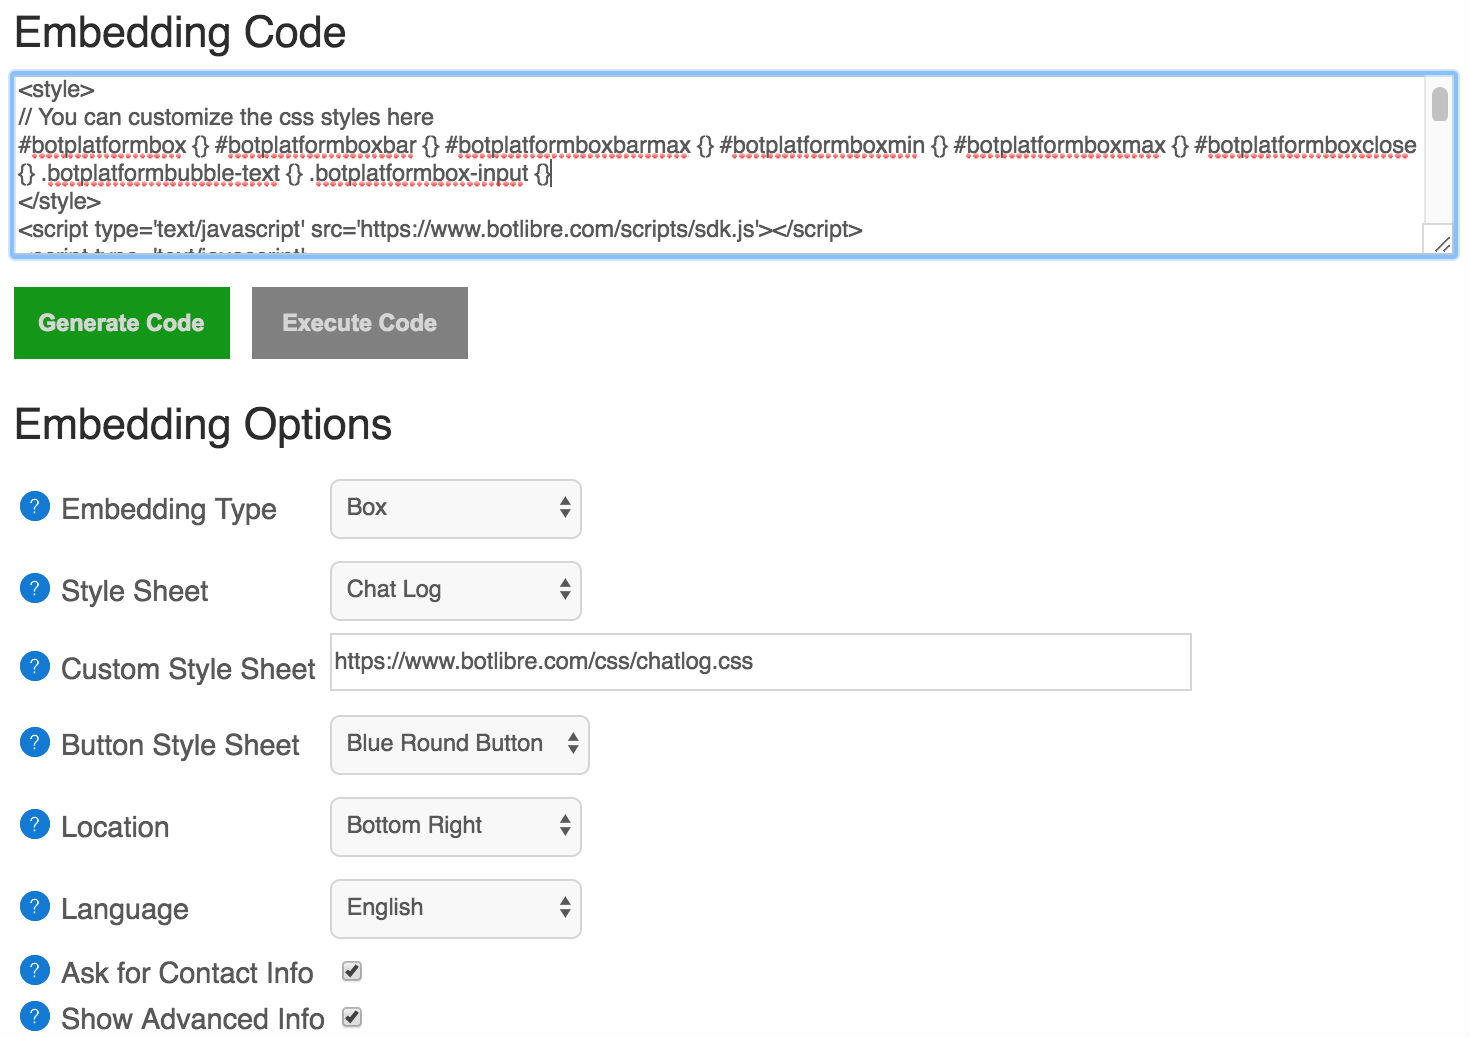
You can embed your live chat channel or chat room on your own website or blog just by adding some simple html to your site.
You are free to embed your own channels for personal, or commercial purposes.


Properties
| Properties |
Description |
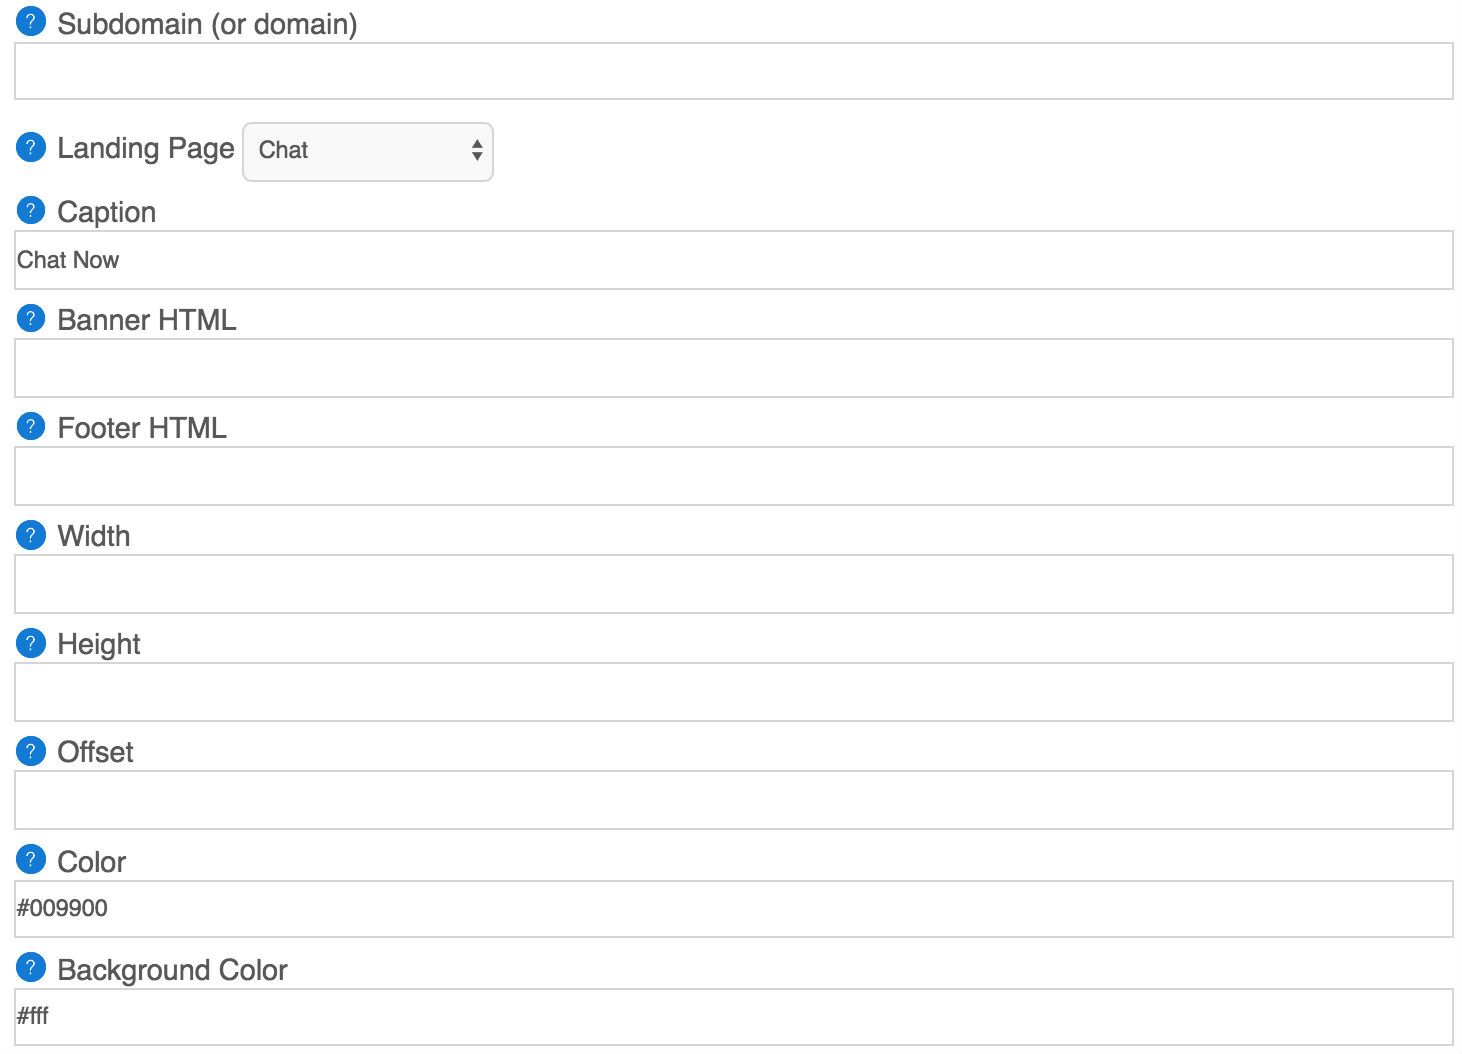
| Subdomain (or domain) |
You can choose a subdomain to host your own chat website, or give a domain that you have registered and forward to this server's ip address. |
| Embedding Type |
Choose an embedding type. |
| Landing Page |
Choose a loading page. |
| Caption |
The text on the button or link. |
| Guest User |
Guest user to connect as. |
| Password |
Password for guest user (not secure). |
| Token |
Token for guest user. |
| Style Sheet |
The CSS style sheet or CSS to customize the page. |
| Banner HTML |
An HTML script or page to embed as the page banner. |
| Footer HTML |
An HTML script or page to embed as the page footer. |
| Width |
The width (in pixels) of the frame, window, or box. |
| Height |
The height (in pixels) of the frame, window, or box. |
| Offset |
The offset (in pixels) of the box from the side. |
| Location |
Choose a location side. |
| Color |
The color to use for the button or link. |
| Background Color |
The background color to use. |
| Prompt |
The text prompt to use in the input (default is 'You say') |
| Send |
The text for the send button (default is 'Send') |
| Ask for Contact Info |
Ask the user for their contact information before connecting. |
| Chat Log |
Show the chat log. |
| Online Users |
Show the online users. |
| Chat Bubble |
Print chat message in chat bubble. |
| Login Banner |
Choose if login banner should be displayed. |
| Facebook Login |
Choose if facebook login option should be provided. |
| Show Title |
Choose if the channel's title should be displayed. |
| Backlink |
Choose if a backlink to Bot Libre should be displayed (requires Bronse account). |
| Show Ads |
Choose if the channel's ad show be displayed. |
Settings
The settings page lets you configure your channel including linking an automated chat bot agent to service your channel,
and configuring your welcome and status messages.


Messages
| Properties |
Description |
| Welcome Message |
Welcome message for your bot. |
| Status Message |
Status message for your bot. |
Automated Chat Bot Agent
| Properties |
Description |
| Bot |
Choose the bot to monitor the channel from the list of your bot. |
| Bot Mode |
The bot can be configured in three different modes: Listen Only,Answer Only, or Answer and Listen, which define how the bot will participate in the conversation. |
Email
| Properties |
Description |
| Email Address |
Email Address. |
| User |
User name. |
| Password |
User password. |
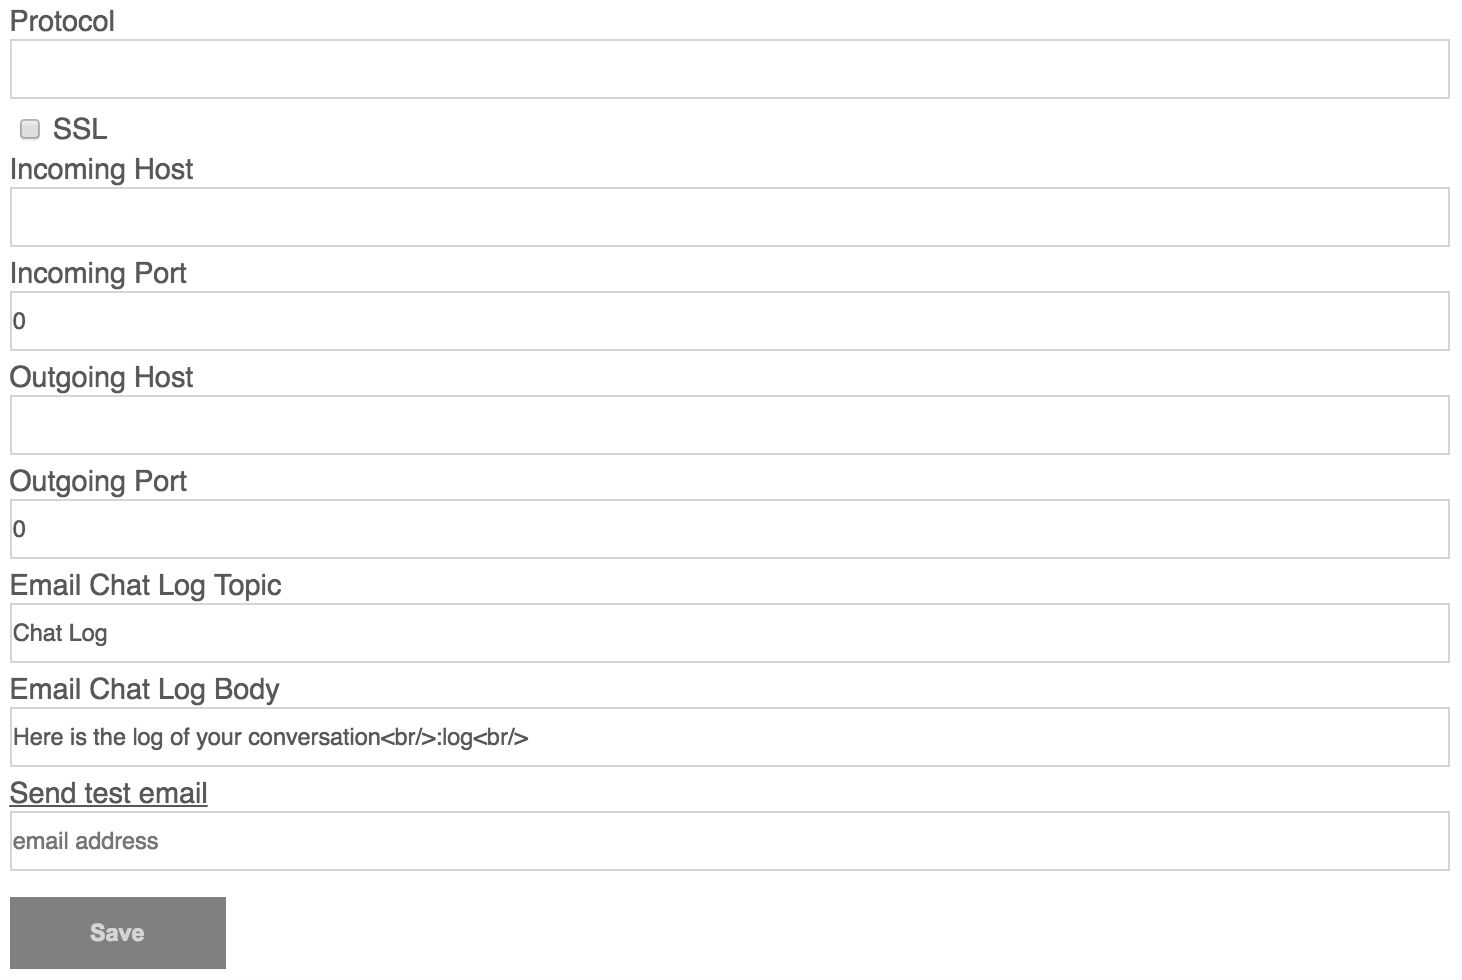
| Protocol |
Protocol specifies interactions. |
| SSL |
Creates a secure connection. |
| Incoming Host |
Incoming host name. |
| Incoming Port |
Incoming port number. |
| Outgoing Host |
Outgoing host name. |
| Outgoing Port |
Outgoing port number. |
| Email Chat Log Topic |
|
| Send test email |
|
Chat Logs
The chat logs tab allows you to monitor your channel.

Properties
| Properties |
Description |
| Search |
Search type. |
| Duration |
Duration of time. |
| Filter |
Filter the results to only include messages containing the filter text. |
Toolbar
| Icon |
Property Name |
Description |
 |
Select |
Select all of the messages. |
 |
Delete |
Delete the selected messages. |
Analytics
Theanalytics tab allows you to view your channel's analytics in the form of charts and tables.
You can view your live chat channel charts for a duration period of either the current week, current month, or all time by selecting a duration period from the duration drop down select.
You can group your channel's analytics either by day, week, or month by selecting a group from a group by drop down select.

Properties
| Properties |
Description |
| Duration |
Displays a graph for a given period of time. User can choose duration of the graph to be displayed for either week, month, or everything. |
| Group By |
Groups graph data either by day, week, or month. |
Analytics Table
The analytics table displays your channel's analytics data.
The data in the table is graphed in a chart above.
You can view your channel's analytics inside table by sorting it in either increasing or decreasing order by clicking on table column's title.

See Also


